Received a new batch of laptops support UEFI. We’ve previously always used legacy PXE boot. Upon some googling we found a way to support both legacy and UEFI verse only supporting one or the other.
This video by BranchCache Bobs shows a great tutorial on how to set it up and the differences between the to!
Create Custom Vendor Classes for Use with your DHCP Policy
Think Custom Vendor Classes as Detection Method’s used to determine how devices are requesting a boot image from the DHCP server.
- Open the DHCP Console and expand the IPv4 Node
- Right-Click on ‘IPv4 Node’ and select ‘Define Vendor Classes’
- Click ‘Add’
- Create the UEFI 64-Bit Vendor class first by entering the following information
- Enter the following information for the respective fields:
- DisplayName: PXEClient (UEFI x64)
- Description: PXEClient:Arch:00007
- ASCII: PXEClient:Arch:00007
- Click ‘OK’
- Click ‘Add’
- DisplayName: PXEClient (UEFI x86)
- Description: PXEClient:Arch:00006
- ASCII: PXEClient:Arch:00006
- Click ‘OK’
- Click ‘Add’
- DisplayName: PXEClient (BIOS x86 & x64)
- Description: PXEClient:Arch:00000
- ASCII: PXEClient:Arch:00000
- Click ‘OK’
Creating Custom DHCP Policies
UEFI 64-Bit DHCP Policy
- Right-Click ‘Policies’ and click ‘New Policy’
- Give the policy a friendly name that coincides with your vendor class naming scheme:
- PolicyName: PXEClient (UEFI x64)
- Description: Delivers the correct bootfile for (UEFI x64)
- Click ‘Next’
- On the ‘Configure Conditions for the policy’ page click ‘add’
- Select the ‘Value’ drop-down box and select the PXEClient (UEFI x64) vendor class that you created in previous steps
- Ensure that you check the box ‘Append wildcard(*)’
- Select ‘Add’
- Select ‘Ok’
- Click ‘Next’
- If you want the policy to affect only a specific range within your scope configure it, otherwise select no and click ‘next’
- On the Configure settings for the policy page ensure that ‘DHCP Standard Options’ is selected from the drop down box
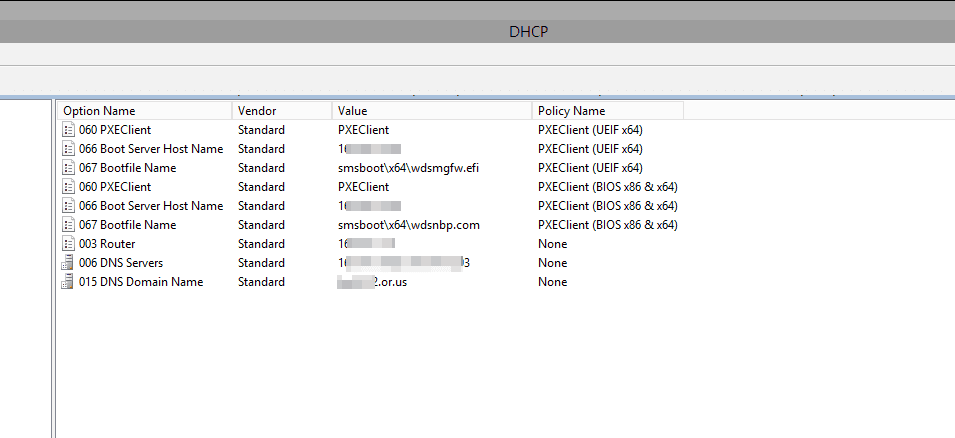
- Configure the following scope options:
- 060: PXEClient
- 066: IP Address of the SCCM or WDS Service
- 067: smsboot\x64\wdsmgfw.efi
- Click ‘Next’
- On the Summary page click ‘Finish’
BIOS 32-Bit & 64-Bit DHCP Policy
- Right-Click ‘Policies’ and click ‘New Policy’
- Give the policy a friendly name that coincides with your vendor class naming scheme:
- PolicyName: PXEClient (BIOS x86 & x64)
- Description: Delivers the correct bootfile for BIOS machines
- Click ‘Next’
- On the ‘Configure Conditions for the policy’ page click ‘add’
- Select the ‘Value’ drop-down box and select the PXEClient (BIOS x86 & x64) vendor class that you created in previous steps
- Ensure that you check the box ‘Append wildcard(*)’
- Select ‘Add’
- Select ‘Ok’
- Click ‘Next’
- If you want the policy to affect only a specific range within your scope configure it, otherwise select no and click ‘next’
- On the Configure settings for the policy page ensure that ‘DHCP Standard Options’ is selected from the drop down box
- Configure the following scope options:
- 060: PXEClient
- 066: IP Address of the SCCM or WDS Service
- 067: smsboot\x64\wdsnbp.com
- Click ‘Next’
- On the Summary page click ‘Finish’
UEFI 32-Bit DHCP Policy
- Right-Click ‘Policies’ and click ‘New Policy’
- Give the policy a friendly name that coincides with your vendor class naming scheme:
- PolicyName: PXEClient (UEFI x86)
- Description: Delivers the correct bootfile for (UEFI x86) machines
- Click ‘Next’
- On the ‘Configure Conditions for the policy’ page click ‘add’
- Select the ‘Value’ drop-down box and select the PXEClient (UEFI x86) vendor class that you created in previous steps
- Ensure that you check the box ‘Append wildcard(*)’
- Select ‘Add’
- Select ‘Ok’
- Click ‘Next’
- If you want the policy to affect only a specific range within your scope configure it, otherwise select no and click ‘next’
- On the Configure settings for the policy, page ensure that ‘DHCP Standard Options’ is selected from the drop down box
- Configure the following scope options:
- 060: PXEClient
- 066: IP Address of the SCCM or WDS Service
- 067: smsboot\x86\wdsmgfw.efi
- Click ‘Next’
- On the Summary page click ‘Finish’
Remove Default PXE Options
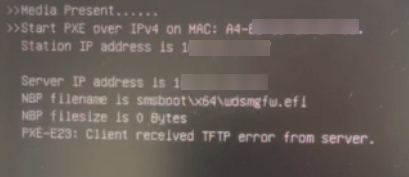
- Ensure that you have removed the 067, 066, 060 options from the default scope options to ensure that the Policies take precedence otherwise you will end up with conflict