Source: nguvu
Last Revised 2 February 2017.
Its critical for data integrity that the LSI HBA cards run in IT (Initiator Target) mode with the correct firmware revision matched to your FreeNAS software. It is possible to pay some vendors to perform the conversion for you at time of purchase however due to ongoing FreeNAS development, you will occasionally need to update your HBA cards firmware version to remain in sync so its worth getting familiar with this procedure from the start.
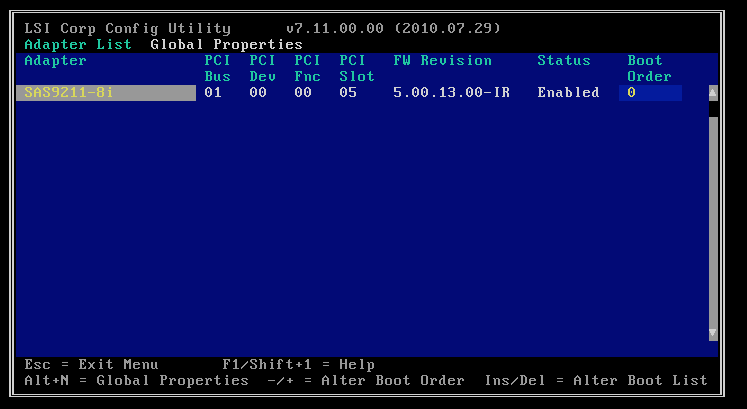
Verify initial firmware version.
Install your HBA card into a suitable PCI slot and enter its configuration page by pressing CTRL-C during boot. You will see a page confirming the model and firmware revision installed on your card as below.In my case, my card is a 9211 with 8 internal ports, firmware 5.00.13.00 in IR (Integrated RAID) mode.
Download firmware
We are going to be using this card with FreeNAS 9.3.1 which requires v20 IT firmware to be installed. To download the correct file, head over to Broadcom’s product pages and select your model of HBA card, in my case the 9211 which is a 6Gb/s model.
EDIT: Here’s a direct link to make life a bit easier.
9211_8i_Package_P20IR_IT_Firmware_BIOS_for_MSDOS_Windows.zip
Install firmware to bootable USB stick
We need to create a bootable USB stick to allow us to boot into a clean environment to enable us to safely flash our HBA card. I use Rufus on windows to make this quick and painless.

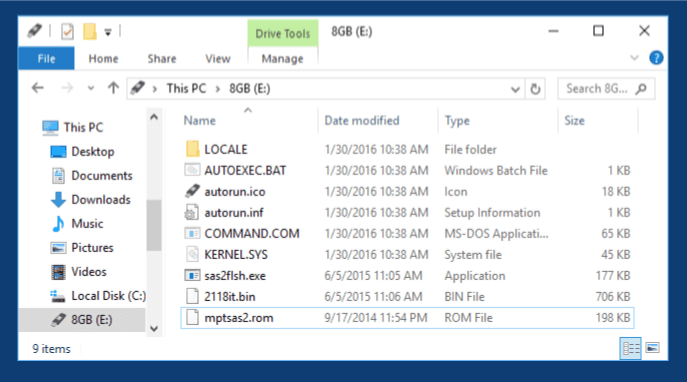
Copy the following three files from your download to our bootable USB stick.
- sasbios_rel/mptsas2.rom
- Firmware/HBA_9211_8i_IT/2118.bin
- sas2flsh_dos_rel/sas2flsh.exe
Once you’re done, you should have a USB stick that looks something like this
Boot & Flash
Boot from the USB stick and wait for the command prompt to appear. You may need to adjust your BIOS boot settings to enable booting from your USB stick.
We are going to use the sas2flsh program to perform the update. Enter the command
sas2flsh -o -e 6
This command will put the card into advanced mode -o and then erase the flash memory -e 6.
You should see the following output
C:\SAS2FLSH.EXE -o -e 6
Advanced Mode Set

Adapter Selected is a LSI SAS: SAS2008(B2)

Executing Operation: Erase Flash

Erasing Flash Region...

Erase Flash Operation Successful!

Resetting Adapter...
Reset Successful!

Finished Processing Commands Successfully.
Exiting SAS2Flash.
Its CRITICAL at this stage you do not reboot the machine or you will leave the HBA card in an unrecoverable state.
Now the card is prepared to receive the new firmware, enter
sas2flsh -o -f 2118it.bin -b mptsas2.rom
The command will put the card into advanced mode again -o and then flash with firmware -f 2118it.bin and bios -b mtpsas2.rom.
You should see the following output
C:\SAS2FLSH.EXE -o -f 2118it.bin -b mptsas2.rom
Advanced Mode Set

Adapter Selected is a LSI SAS: SAS2008(B2)

Executing Operation: Flash Firmware Image

Firmware Image has a Valid Checksum.
Firmware Version 20.00.04.00
Firmware Image compatible with Controller.

Valid NVDATA Image found.
NVDATA Version 14.01.00.00
Checking for a compatible NVData image...

NVDATA Device ID and Chip Revision match verified.
Valid Initialization Image verified.
Valid BootLoader Image verified.

Chip is in RESET state. Attempting Host Boot...
Firmware Host Boot Successful.

Mfg Page 2 Mismatch Detected.
Writing Current Mfg Page 2 Settings to NVRAM.
Updated Mfg Page 2.

Resetting Adapter...
Adapter Successfully Reset.

Chip is in RESET state. Performing Host Boot...
Firmware Host Boot Successful.

Beginning Firmware Download...
Firmware Download Successful.

Resetting Adapter...
Adapter Successfully Reset.

Executing Operation: Flash BIOS Image

Validating BIOS Image...

BIOS Header Signature is Valid

BIOS Image has a Valid Checksum.

BIOS PCI Structure Signature Valid.

BIOS Image Compatible with the SAS Controller.

Attempting to Flash BIOS Image...

Verifying Download...

Flash BIOS Image Successful.

Updated BIOS Version in BIOS Page 3.

Finished Processing Commands Successfully.
Exiting SAS2Flash.
Once the flashing process has completed, verify the install has been completed correctly before rebooting with sas2flsh -listall. It’s important to do this before rebooting because if anything has gone wrong, your card will be left in an unusable state.
C:\SAS2FLSH.EXE -listall
Adapter Selected is a LSI SAS: SAS2008(B2)

Num Ctlr FW Ver NVDATA x86-BIOS PCI Addr
----------------------------------------------------------------------------

0 SAS2008(B2) 20.00.04.00 14.01.00.08 07.39.00.00 00:01:00:00

Finished Processing Commands Successfully.
Exiting SAS2Flash.
If you enter the HBA cards BIOS again by pressing CTRL-C during boot, you’ll see confirmation you are now running in IT mode with v20 firmware.
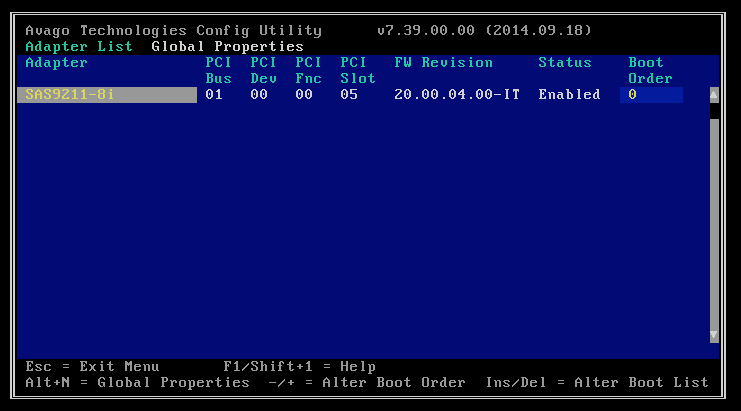
Done!
Congratulations! Your card is now ready for use in FreeNAS.
This guide was written by nguvu.org. Direct Link Here.